好久好久没有玩过web啦。很多东西都过时了,也忘记了,最近不是流行Spring-boot吗?就简单的写个例子看看是如何的不一样
注:本文需要一定的j2ee基础
工程创建
打开IDEA,新建一个Gradle工程,GroupId:lckiss.com、ArtifactId:Spring-Boot,选择项目路径后一路next。
项目创建完成后,我们添加一些东西。按照官网的quick start:https://projects.spring.io/spring-boot/#quick-start
打开配置文件build.gradle,编辑内容至如下:
group 'lckiss.com'
version '1.0-SNAPSHOT'

buildscript {
    repositories {
        mavenCentral()
    }
    dependencies {
        classpath("org.springframework.boot:spring-boot-gradle-plugin:2.0.0.RELEASE")
    }
}

apply plugin: 'java'
apply plugin: 'eclipse'
apply plugin: 'idea'
apply plugin: 'org.springframework.boot'
apply plugin: 'io.spring.dependency-management'

sourceCompatibility = 1.8
targetCompatibility = 1.8

repositories {
    mavenCentral()
}

dependencies {
    testCompile group: 'junit', name: 'junit', version: '4.12'
    compile("org.springframework.boot:spring-boot-starter-web")
}

bootJar {
    baseName = 'gs-spring-boot'
    version =  '0.1.0'
}
新建一个包com.lckiss.hello,并创建一个java类HelloController,内容为:
@RestController
public class HelloController {

    @RequestMapping("/")
    public String index() {
        return "Greetings from Spring Boot!";
    }
}
同目录下创建一个Application:
@SpringBootApplication
public class Application {

    public static void main(String[] args) {
        SpringApplication.run(Application.class, args);
    }

    @Bean
    public CommandLineRunner commandLineRunner(ApplicationContext ctx) {
        return args -> {
            System.out.println("Let's inspect the beans provided by Spring Boot:");

            String[] beanNames = ctx.getBeanDefinitionNames();
            Arrays.sort(beanNames);
            for (String beanName : beanNames) {
                System.out.println(beanName);
            }
        };
    }

}
在Application这个类旁边会有一个运行按钮,点下,控制台会输出一些日志,还有logo,并且还有端口什么的,打开浏览器,输入http://localhost:8080/,你会发现出现了Greetings from Spring Boot!字样,原因是index方法定义的url路径为/,所以返回的就是index的那个字符串了。
PS:HelloController中@RestController可以去掉,然后换成另一种风格:
@Controller
public class HelloController {

    @ResponseBody
    @RequestMapping("/")
    public String index() {
        return "Greetings from Spring Boot!";
    }
}
@RestController @Controller +@ResponseBody 它下面所有的方法都返回json格式
结果是一样的,你可以运行后尝试。
换种启动方式
不知道有没有注意到上面的Application写法,上面的注解是不是可以换一个?
/**
 * ComponentScan扫描Controller位置
 */@EnableAutoConfiguration
@ComponentScan(basePackages = "com.lckiss.hello")
public class App {

    public static void main(String[] args) {
        SpringApplication.run(App.class, args);
    }
}
新建一个App的类,将以前的Application的类干掉,从这里启动也是可以的。但是需要注意的是,如果不在同一个包下,需要加上注解@ComponentScan(basePackages = “com.lckiss.hello”),聪明的同学会发现,后面是包名,yes,确实如此。你依旧可以尝试运行。
修改启动图标和端口号
项目创建后有一个main目录,下面有一个java和resources目录,在resources下创建两个文件一个是application.properties,还有一个是banner.txt
我的是:
.__          __   .__
|  |   ____ |  | _|__| ______ ______
|  | _/ ___\|  |/ /  |/  ___//  ___/
|  |_\  \___|    <|  |\___ \ \___ \
|____/\___  >__|_ \__/____  >____  >
          \/     \/       \/     \/
GetStart from localhost:8080 !!!
粘贴到banner.txt即可。
修改服务器端口号:
在application.properties中写入:
端口号修改
server.port=8081
重新运行下你的项目,是不端口号变成8081了。我想结果肯定是的,并且启动界面也更换了。
全局异常处理与自定义业务异常
在HelloController来模拟一下异常的发生。
/**
 * 异常模拟 全局处理 可以每个都加上try catch,但是可以更简单
 * http://localhost:8080/test1
 * @return
 */@RequestMapping("/test1")
public String test1() {
    int i=1/0;

    return "Greetings from test1!";
}

/**
 * 异常模拟 2 http://localhost:8080/test2
 * @return
 */@RequestMapping("/test2")
public String test2() {
    try {
        int i=1/0;
    }catch (Exception e){

    }
    return "Greetings from test2!";
}

/**
 * 自定义业务异常模拟 2 http://localhost:8080/test3
 * @return
 */@RequestMapping("/test3")
public String test3() throws BusinessException {
   throw new BusinessException(500,"出错了","500异常");
}
将上面的三种异常添加到HelloController中,其中第一种是未被处理的,第二种是被try,catch的,第三种是自定义的。报错先不管,继续创建一个包com.lckiss.exception,创建一个自定义的BusinessException
public class BusinessException extends Exception {
    /**
     * 异常处理编码
     */    private Integer code;
    /**
     * 异常处理信息
     */    private String msg;
    /**
     * 具体描述
     */    private String desc;

    public BusinessException(Integer code, String msg, String desc) {
        this.code = code;
        this.msg = msg;
        this.desc = desc;
    }

    public BusinessException(String msg) {
        this.msg = msg;
    }

    public Integer getCode() {
        return code;
    }

    public void setCode(Integer code) {
        this.code = code;
    }

    public String getMsg() {
        return msg;
    }

    public void setMsg(String msg) {
        this.msg = msg;
    }

    public String getDesc() {
        return desc;
    }

    public void setDesc(String desc) {
        this.desc = desc;
    }
}
在com.lckiss.hello包下创建一个GlobalExceptionHandler类,内容为:
/**
 * @ControllerAdvice 处理Controller中所有没有被try catch包裹(比如test1方法) 的一个注解
 */
@ControllerAdvice
public class GlobalExceptionHandler {

    //全局异常处理(异常的类型)
    @ExceptionHandler(Exception.class)
    @ResponseBody
    public Map<String,Object> handlerExcetion(){
        Map<String,Object> map=new HashMap<String,Object>();
        map.put("code",500);
        map.put("msg","系统繁忙,请稍候再试");
        return map;
    }


    //自定义的业务异常处理(自定义的异常类型)
    @ExceptionHandler(BusinessException.class)
    @ResponseBody
    public Map<String,Object> handlerBusinessExcetion(BusinessException businessException){
        Map<String,Object> map=new HashMap<String,Object>();
        map.put("code",businessException.getCode());
        map.put("msg",businessException.getMsg());
        map.put("desc",businessException.getDesc());
        return map;
    }

    //自定义的SQL异常处理
    @ExceptionHandler(SQLException.class)
    @ResponseBody
    public Map<String,Object> handlerSQLExcetion(){
        Map<String,Object> map=new HashMap<String,Object>();
        //TODO SQL异常处理逻辑
        return map;
    }
}
写完后,去HelloController中导包,确认无错后,分别访问三种异常。
第一种返回:{
“msg”: “系统繁忙,请稍候再试”,
“code”: 500
}
第二种返回:Greetings from test2!
第三种返回:{
“msg”: “出错了”,
“code”: 500,
“desc”: “500异常”
}
聪明的你结合注释应该就明白了。当然后面的SQLException是没有可演示的,只是伪代码,别多想。
集成jsp
虽然说现在流行前后端分离,但是这个jsp,还是得演示下呀。在build.gradle中,添加一些东西,部分代码如下:
...
apply plugin: 'io.spring.dependency-management'
//jsp needed
apply plugin: 'war'
dependencies {
 ....
 compile("org.springframework.boot:spring-boot-starter-web")
 //jsp
 compile 'org.apache.tomcat.embed:tomcat-embed-jasper'
}
在application.properties中加入:
#jsp
spring.mvc.view.prefix=/WEB-INF/jsp/
spring.mvc.view.suffix=.jsp
然后创建以下目录结构:
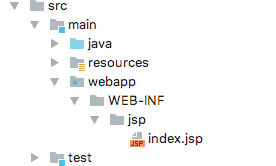
相信你不会建错,index.jsp内容很简单:
<%@ page language="java" pageEncoding="utf-8" %>
<!DOCTYPE html>
<html>
<head>
    <title>title</title>
</head>
<body>
this is a SpringBoot Jsp!!!
</body>
</html>
准备工作做完了,搞一个访问入口吧。在包com.lckiss.hello下新建类JspController:
@Controller
public class JspController {
    /**
     * @return index.jsp
     */    @RequestMapping("/jsp")
    public String jsp() {
       return "index";
    }
}
没错就是这么简单,但是注意哦,这里不是用的@RestController,所以如果你要在HelloController中创建的话,需要将RestController改为Controller,并且,返回json的加上@ResponseBody。
好了,访问下http://localhost:8080/jsp,你就会发现jsp上的内容了。如果看不到,自己找错误咯,比如路径,配置文件有没有多空格等等。
集成Mybatis与连接数据库
在application.properties中添加内容(当然,你得有一个本地的mysql数据库,这里我就不多说了):
#sql连接
spring.datasource.url = jdbc:mysql://localhost:3306/你创建的数据库名?useUnicode=true&characterEncoding=utf-8
spring.datasource.username = 你的用户名
spring.datasource.password = 你的密码
spring.datasource.driverClassName = com.mysql.jdbc.Driver #驱动名称不必改变 除非你换了其他数据库
添加gradle依赖,在build.,gradle这个位置中添加:
......
//jsp
compile 'org.apache.tomcat.embed:tomcat-embed-jasper'

//配置mybatis
compile("org.mybatis.spring.boot:mybatis-spring-boot-starter:1.3.2")
compile("org.mybatis.spring.boot:mybatis-spring-boot-starter-test:1.3.2")

//mysql驱动
compile 'mysql:mysql-connector-java'
.....
数据库中创建一个表:
DROP TABLE IF EXISTS `user`;
    CREATE TABLE `user` (
    `id` int(11) NOT NULL AUTO_INCREMENT,
    `name` varchar(36) NOT NULL,
    PRIMARY KEY (`id`)
    ) ENGINE=InnoDB AUTO_INCREMENT=2 DEFAULT CHARSET=utf8;
创建以下类
package com.lckiss.hello;

import mapper.UserMapper;
import model.User;
import org.springframework.beans.factory.annotation.Autowired;
import org.springframework.web.bind.annotation.RequestMapping;
import org.springframework.web.bind.annotation.RestController;

@RestController
public class UserController {

    @Autowired
    private UserMapper userMapper;

    /**
     * http://localhost:8080/user-detail?id=1
     * @param id
     * @return
     */    @RequestMapping("user-detail")
    public User selectUserById(int id){
        return  userMapper.selectUserById(id);
    }


    /**
     * http://localhost:8080/insert-user?name=xx
     * @param name
     * @return
     */    @RequestMapping("insert-user")
    public String insertUser(String name){
          userMapper.insertUser(name);
          return "ok";
    }
}
一个model
package com.lckiss.model;

public class User {
    private Integer id;
    private String name;

    public Integer getId() {
        return id;
    }

    public void setId(Integer id) {
        this.id = id;
    }

    public String getName() {
        return name;
    }

    public void setName(String name) {
        this.name = name;
    }
}
一个mapper
package com.lckiss.mapper;

import model.User;
import org.apache.ibatis.annotations.Insert;
import org.apache.ibatis.annotations.Param;
import org.apache.ibatis.annotations.Select;

public interface UserMapper {
    @Insert("insert into user(name) values(#{name})")
    void insertUser(@Param("name") String name);

    @Select("select * from user where id=#{id}")
    User selectUserById(@Param("id") Integer id);
}
在UserController中,我们省略了service层,直接用@Autowired导入了UserMapper进行操作,实际开发中,这样肯定是不允许的,这里只是演示。
最后在App.java文件中加入
@EnableAutoConfiguration
@ComponentScan(basePackages = "com.lckiss.hello")
//这行是新增的
@MapperScan(basePackages = "com.lckiss.mapper")
完成后重启服务器,尝试先插入一条数据:
http://localhost:8080/insert-user?name=xx
再查询该数据:
http://localhost:8080/user-detail?id=1
待续
源代码:https://github.com/Anr-C/SpringBoot
简单介绍到此,更多请查看:使用IDEA创建一个简单的SpringBoot项目(二)
本站由以下主机服务商提供服务支持:
0条评论